I recently set up a portfolio for a friend (in exchange for them to buy me milk tea at a later date) and decided to write down the instructions for how to do so. This is a generally comprehensive tutorial (that should also generally be friendly to a non-technical audience).
In this tutorial, we'll be using three different services:
- Namecheap, to purchase our domain/URL.
- Cloudflare, to host our web page.
- GitHub, to hold our codebase.
The benefits to using this tutorial (and making your own website/blog in general) are as follows:
- it's relatively cheap, with the yearly cost for your website only being the cost of the domain name, since we're not using any of the other services that cost money. I am someone who doesn't really like using subscription services unless I have to. The cost of maintaining this website may be a little daunting to others, so I have compiled a list of other commonly used subscriptions that are more expensive than a $20/yr domain name at the time of writing this (prices in USD and how many times more expensive they are):
- Discord Nitro (Classic): $29.99/yr (1.4995x)
- Discord Nitro: $99.99/yr (4.9995x)
- Netflix (Standard w/ Ads): $95.88/yr (4.794x)
- Netflix (Standard): $215.88/yr (10.794x)
- Netflix (Premium): $299.88/yr (14.994x)
- Spotify (Individual): $155.88/yr (7.794x)
- Spotify (Student): $83.88/yr (4.194x)
- Spotify (Family): $263.88/yr (13.194x)
- your website will be responsive, meaning that the content on your web page will be able to adapt to the device you view it on (i.e. PC vs. mobile) since we're using a static site generator called Hugo.
- since we're using this static site generator, it becomes very easy to update your blog whenever you want since Hugo is made for blogging.
- creating your own personal website is fun! Whether you use it for an online portfolio or some other creative form of expression other than typical social media applications, using your own website is a lot more freeing and more intentional. There are millions of reasons to have your own website, see more resources to inspire you below:
If you already have accounts for GitHub, Namecheap, and Cloudflare and if you have VSCode, Chocolatey, Go, Hugo, and GitHub Desktop installed, you can skip to setting up the codebase.
Set-up #
Making accounts #
You will need to make a few accounts for the various platforms we will be using, namely an account for each of the following:
- GitHub, a web platform for hosting codebases online (using a tool called
git). - Namecheap, a web platform for purchasing web domains.
- Cloudflare, a web platform that we will be using for hosting our web page.
Installing software #
Note: All of these instructions were done with Windows computers in mind. Follow this tutorial for MacOS or Linux.
Visual Studio Code (VSCode) #
Visual Studio Code is a code editing software that nicely integrates with other tools like Github. You can download it here. This will make it easier to navigate the codebase for your website (as well as publishing the site).
Chocolatey #
We need to install Chocolatey, a package manager for Windows, to install everything else that we need. You could use other package managers like listed here on the Hugo documentation, but I'm using Chocolatey for this example.
Go #
As you might expect, we need to install Go to use Hugo. Click here to find downloads for Go. Click here for some optional Go Gopher lore.
Hugo #
We also need to install Hugo, our static site generator by running the following:
choco install hugo --confirm  # run just this for most use cases
choco install hugo-extended # if you want more features, run this insteadGitHub Desktop #
GitHub Desktop is a desktop client for helping development using GitHub. This is mostly optional, but it gets rid of a lot of the issues surrounding logging into GitHub from the command line (and needing to deal with SSH keys).
GitHub #
In this section, we will be focusing on how to create a repository (or project) with a template blog.
Creating Hugo project #
Open Windows Powershell (potentially running as administrator) and navigate to a folder in your computer where you want to house the files for your website. If you do not know how to use Windows Powershell commands, cd is for "changing directory" to be the path you input. This is probably the most used command you will use. I put my folder for my website in my GitHub folder, specifically the path C:\Users\USERNAME\Documents\GitHub, so I would navigate to this folder by running the following:
cd C:\Users\USERNAME\Documents\GitHubCreate a folder for your site by running
hugo new site mynewsitewhich will create a folder called mynewsite/.
Looking for blog themes #
Now, we're at the step where we can do something fun: looking for blog themes. There is a big cohesive list of Hugo themes that you can find here, sorted by popularity. Go to any of these example themes and hit "Download" to be redirected to a GitHub repository.
This site uses a modified version of the theme typo by tomfran which is a very minimalistic and simple theme especially for blogging. Copy the link to the repository for the theme you like the most and run the following command to "import" it as a theme for your own site:
cd mynewsite  # to enter your folder
git init
git submodule add https://github.com/tomfran/typo themes/typo # edit with your github URL and "themes/REPO_NAME"Setting up a GitHub repository #
We need to set up a GitHub repository for housing all of our codebase in this folder (mynewsite/). A repository is almost like a project. We can create a new repository by visiting repo.new and name it whatever you'd like. Then, run the following command:
git remote add origin https://github.com/YOUR_GITHUB_USERNAME/REPOSITORY_NAME
git branch -M main
git push -u origin mainNamecheap #
Buying a domain #
We want to buy a domain that will redirect to this codebase. This step is entirely optional and it is entirely doable to make a website/blog without spending any money (blog post tutorial for this coming at a later date). We need to use some service provider that allows us to buy these -- in this tutorial, I'll be using namecheap.com.
On Namecheap, we can start by searching for domain names that we can register. My blog, s3gfault.dev has the top-level domain (TLD) of .dev, which costs $20.98 USD/yr for renewal. The initial cost of mine was $12.98 for the first year. Your domain price will vary by TLD, so consult this list to see the prices of renewal per year. Commonly used TLDs and their prices (in USD) as of the writing of this post are:
.com: $18.48/yr.net: $18.58/yr
Purchase the domain you want. Once you purchase the domain, go to your account page and go to "Domain List". You will see a dashboard with your newly purchased domain on it. Click "Manage" on this domain and leave this tab open for later.
Cloudflare #
We're going to be using Cloudflare Pages to host our website. In this section, we are going to do several things:
- setting up our domain by onboarding our Namecheap domain, setting up the Cloudflare nameservers, and setting up the DNS records.
- and setting up our page by creating a Cloudflare page, connecting it to our GitHub repository, and adding our custom Namecheap domain to it.
Onboarding our Namecheap domain #
To connect our domain to Cloudflare, go to your Cloudflare Dashboard and click "Onboard a domain." Enter your domain and hit "continue." You will encounter a payment screen that asks you to select a plan for your domain. We're picking the free plan for this tutorial.
Setting up nameservers #
There should be a screen that shows two different Cloudflare nameservers, each taking the format of SOME_WORD.ns.cloudflare.com.
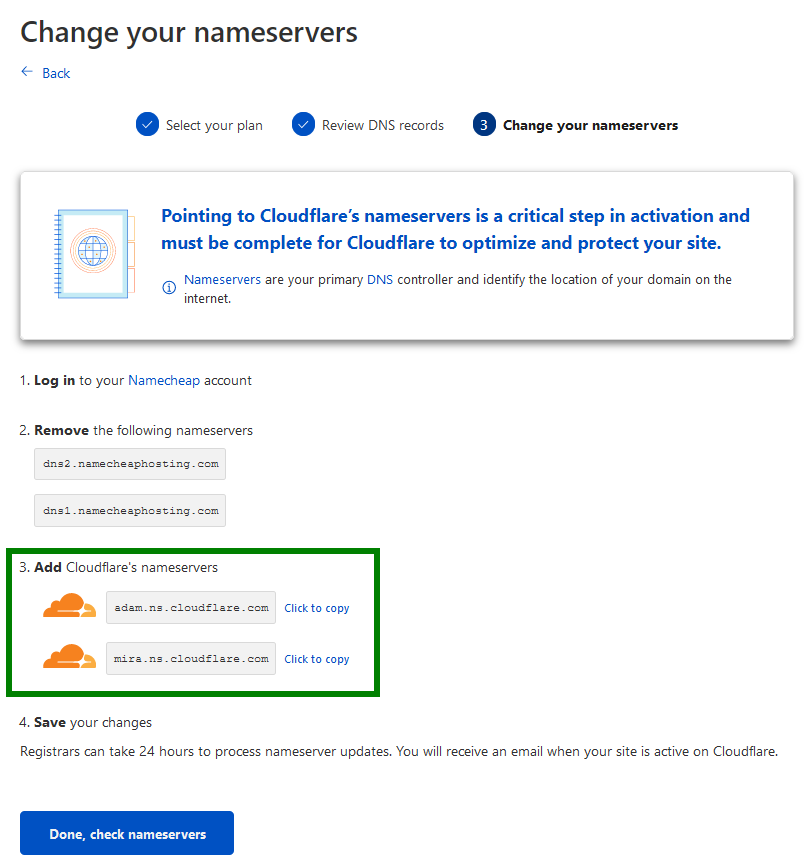
Go back to your Namecheap tab from Step 1: Buying a domain where we are in the settings for your domain. Go to the "nameservers" section and change the "custom DNS" to be both of those SOME_WORD.ns.cloudflare.com Cloudflare nameservers. Save these changes.
Go back to your Cloudflare tab and click "Check Nameservers". You may need to wait for the nameservers to be verified, since it could potentially take up to 24-48 hours for the DNS changes to propogate. In my experience, it verifies almost instantly.
Setting up DNS records #
Now that the nameservers have updated, we can edit the DNS records. You can do this by going from Dashboard > Domains > YOURDOMAIN > DNS > Records. Make sure you have the two records:
Type    Name               Content                                   Proxy Status    TTL
CNAME   YOURDOMAIN.com     YOUR_CLOUDFLARE_PAGES_NAME.pages.dev      Proxied         Auto
CNAME www YOUR_CLOUDFLARE_PAGES_NAME.pages.dev Proxied AutoCreating Cloudflare page #
First, we need to allow our repository to be seen by the Cloudflare workers we'll be using later. Go to this page and scroll down to the "Repository access" section. Select "only select repositories" and choose your new one from the dropdown.
We can make a Cloudflare page by going from Dashboard > Compute & AI > Workers & Pages and click the "Create Application" button, which can be seen below:
Connecting to our GitHub repository #
Once we are at the above screen, select "Continue with GitHub" and connect your GitHub repository from earlier to this Cloudflare page. Now we are setting up the application. Name the project whatever you want. Click "Advanced settings" and ensure you write down the following for the build settings:
- Build command:
hugo --minify -b https://YOUR_NAMECHEAP_DOMAIN.com - Build output:
public - Root directory:
- Build comments: Enabled
Adding our custom domain #
In our Cloudflare page, there are several tabs: deployments, metrics, custom domains, and settings. Go to "Custom domains" and set up a custom domain for both of your domain(s):
example.comwww.example.com(withwwwprefix, since we set up the DNS records to also have this). Both of these domains should show as "active."
Editing our site #
Note: There's no good way to demonstrate how to edit your own Hugo blog since each theme does things differently. The information below is applicable for all Hugo blogs, but editing the content for your theme that you choose to import may vary.
Open your folder on your computer mynewsite/ which holds your project files in VSCode. You can create a new post by running the following command in Powershell:
hugo new content posts/my-first-post.mdAll of Hugo posts are in a format called Markdown, a widely used syntax editor with the file extension .md. You may be familiar with this syntax if you use various messaging applications like Discord, WhatsApp, or Telegram, i.e. **bold text** produces bold text, etc.
Each Hugo post typically has various fields in the header that allow for you to write the title, date, summaries, etc. See more about what other parameters are customizable in the front matter here. For example, here is the front matter for a blog post that has a title, description, and tags:
+++
title = "My Post Title"
date = 2023-06-25T17:04:56-04:00
description = "My description - this will show up in the embed of a link when you send it to someone."
summary = "This post summary - this will show up on my blog."
tags = ["tag1", "tag2"]
+++When you first create a post like my-first-post.md above, there should be a section automatically created for the front matter, populated with the title and date typically. You can edit your blog post by writing under this front matter in the .md file for your post.
To do further customization, look at the GitHub repository for your theme that you are using. This theme, typo, has a very good wiki page to tell you how to do various customizations, like editing your theme to be custom colors (see mine here).
To see your updates live, you can run your website locally by typing hugo server --navigateToChanged in Powershell in your website folder. When you navigate to 127.0.0.1:1313 in your browser, it should show up as your website.
Publishing our site #
To publish our site, we need to deploy the code from the GitHub repository. Thankfully, using the Cloudflare workers and build commands we set up earlier, we can very easily update our codebase and publish our website with ease.
Open your project folder in VSCode and go to the Source Control button on the left button ribbon. This is where you will push (code to the repository) and pull (code from the repository). Whenever you push code, the code will automatically be build by Cloudflare and hosted on your webpage. You can monitor your build progress (and past build progress) in your Cloudflare Page's "deployments" tab.